一、MQTT协议
MQTT(Message Queuing Telemetry Transport,消息队列遥测传输协议),是一种基于发布/订阅(publish/subscribe)模式的“轻量级”通讯协议,该协议构建于TCP/IP协议上。MQTT最大优点在于,用极少的代码和有限的带宽,为连接远程设备提供实时可靠的消息服务。作为一种低开销、低带宽占用的即时通讯协议,使其在物联网、小型设备、移动应用等方面有较广泛的应用。
要了解 MQTT 的工作原理,首先需要掌握以下几个概念:MQTT 客户端、MQTT Broker、发布-订阅模式、主题、QoS。
MQTT 客户端
任何运行 MQTT 客户端库的应用或设备都是 MQTT 客户端。例如,使用 MQTT 的即时通讯应用是客户端,使用 MQTT 上报数据的各种传感器是客户端,各种 MQTT 测试工具也是客户端。
MQTT Broker
MQTT Broker 是负责处理客户端请求的关键组件,包括建立连接、断开连接、订阅和取消订阅等操作,同时还负责消息的转发。一个高效强大的 MQTT Broker 能够轻松应对海量连接和百万级消息吞吐量,从而帮助物联网服务提供商专注于业务发展,快速构建可靠的 MQTT 应用。
发布-订阅模式
发布-订阅模式与客户端-服务器模式的不同之处在于,它将发送消息的客户端(发布者)和接收消息的客户端(订阅者)进行了解耦。发布者和订阅者之间无需建立直接连接,而是通过 MQTT Broker 来负责消息的路由和分发。
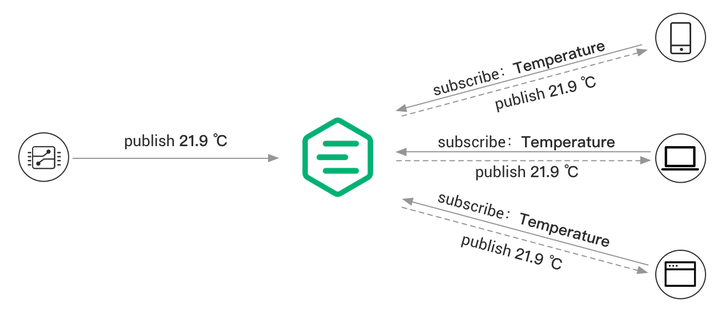
下图展示了 MQTT 发布/订阅过程。温度传感器作为客户端连接到 MQTT Broker,并通过发布操作将温度数据发布到一个特定主题(例如 Temperature)。MQTT Broker 接收到该消息后会负责将其转发给订阅了相应主题(Temperature)的订阅者客户端。

主题
MQTT 协议根据主题来转发消息。主题通过 / 来区分层级,类似于 URL 路径,例如:
1
2
3
4
5
| chat/room/1
sensor/10/temperature
sensor/+/temperature
|
MQTT 主题支持以下两种通配符:+ 和 #。
+:表示单层通配符,例如 a/+ 匹配 a/x 或 a/y。#:表示多层通配符,例如 a/# 匹配 a/x、a/b/c/d。
注意:通配符主题只能用于订阅,不能用于发布。
QoS
MQTT 提供了三种服务质量(QoS),在不同网络环境下保证消息的可靠性。
- QoS 0:消息最多传送一次。如果当前客户端不可用,它将丢失这条消息。
- QoS 1:消息至少传送一次。
- QoS 2:消息只传送一次。
二、MQTT服务搭建
EMQ X 是一款完全开源,高可用低时延的百万级分布式物联网 MQTT 5.0 消息服务器。EMQX 支持多种协议,包括 MQTT (3.1、3.1.1 和 5.0)、HTTP、QUIC 和 WebSocket 等,保证各种网络环境和硬件设备的可访问性。EMQX 还提供了全面的 SSL/TLS 功能支持,比如双向认证以及多种身份验证机制,为物联网设备和应用程序提供可靠和高效的通信基础设施。
使用Docker可以快速搭建服务
运行以下命令获取 Docker 镜像:
1
| docker pull emqx/emqx:5.2.1
|
运行以下命令启动 Docker 容器。
1
| docker run -d --name emqx -p 1883:1883 -p 8083:8083 -p 8084:8084 -p 8883:8883 -p 18083:18083 emqx/emqx:5.2.1
|
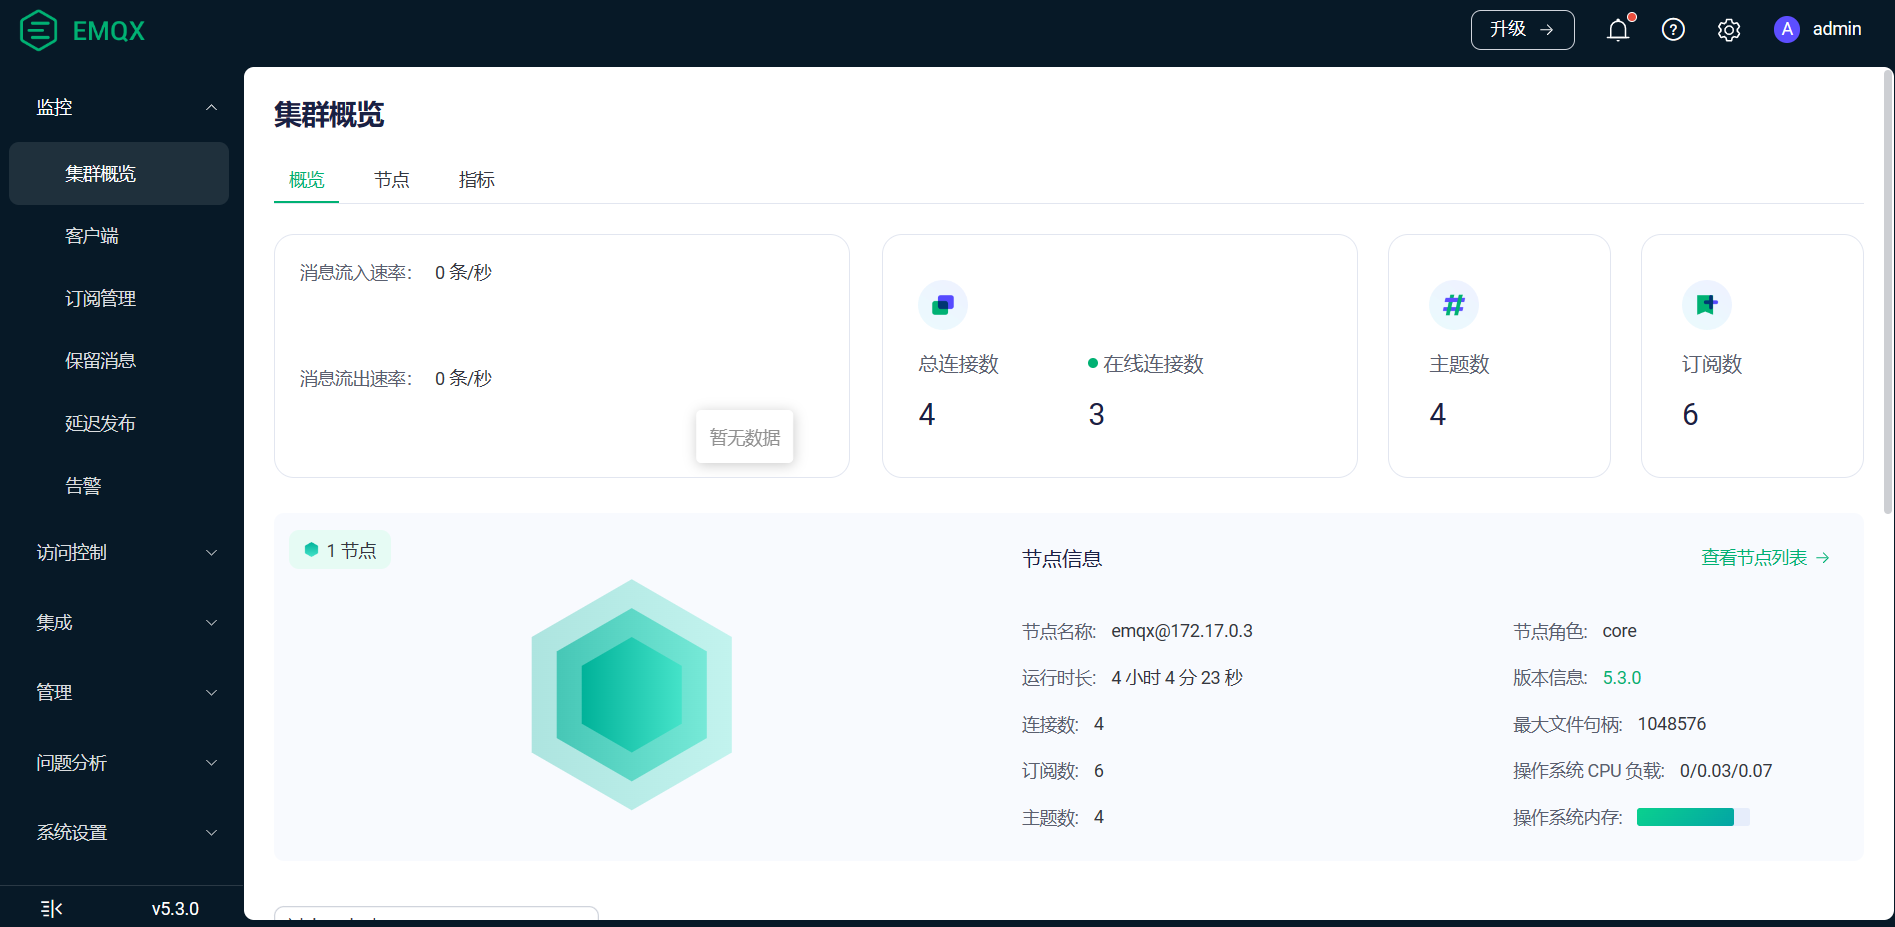
通过浏览器访问 http://localhost:18083/(localhost 可替换为您的实际 IP 地址)以访问 EMQX Dashboard 管理控制台,进行设备连接与相关指标监控管理。
默认用户名及密码:
admin
public

三、SpringBoot集成
maven依赖
1
2
3
4
5
6
7
8
9
| <dependency>
<groupId>org.springframework.integration</groupId>
<artifactId>spring-integration-stream</artifactId>
</dependency>
<dependency>
<groupId>org.springframework.integration</groupId>
<artifactId>spring-integration-mqtt</artifactId>
</dependency>
|
application.yml文件配置
1
2
3
4
5
6
7
8
9
10
11
12
13
14
15
16
17
18
19
20
|
mqtt:
username: admin
password: public
url: tcp://ip:1883
clientId: client-test_server
defaultTopic: topic
keepAliveInterval: 60
automaticReconnect: true
cleanSession: false
completionTimeout: 30
|
订阅接受消息
1
2
3
4
5
6
7
8
9
10
11
12
13
14
15
16
17
18
19
20
21
22
23
24
25
26
27
28
29
30
31
32
33
34
35
36
37
38
39
40
41
42
43
44
45
46
47
48
49
50
51
52
53
54
55
56
57
58
59
60
61
62
63
64
65
66
67
68
69
70
71
72
73
74
75
76
77
78
79
80
81
82
83
84
85
86
87
88
89
90
91
92
93
94
95
96
97
98
99
100
101
102
103
104
105
106
107
108
109
110
111
112
113
114
115
116
117
118
119
120
121
122
123
124
125
126
127
128
129
130
131
132
133
134
| @Slf4j
@Configuration
@IntegrationComponentScan
public class MqttSenderConfig {
@Value("${mqtt.username}")
private String username;
@Value("${mqtt.password}")
private String password;
@Value("${mqtt.url}")
private String url;
@Value("${mqtt.clientId}")
private String clientId;
@Value("${mqtt.defaultTopic}")
private String defaultTopic;
@Value("${mqtt.keepAliveInterval}")
private Integer keepAliveInterval;
@Value("${mqtt.automaticReconnect}")
private Boolean automaticReconnect;
@Value("${mqtt.cleanSession}")
private Boolean cleanSession;
@Value("${mqtt.completionTimeout}")
private Integer completionTimeout;
@Bean
public MqttConnectOptions mqttConnectOptions() {
MqttConnectOptions options = new MqttConnectOptions();
options.setUserName(username);
options.setPassword(password.toCharArray());
options.setServerURIs(new String[]{url});
options.setKeepAliveInterval(keepAliveInterval);
options.setAutomaticReconnect(automaticReconnect);
options.setCleanSession(cleanSession);
options.setConnectionTimeout(completionTimeout);
return options;
}
@Bean
public MqttPahoClientFactory mqttPahoClientFactory(MqttConnectOptions mqttConnectOptions) {
DefaultMqttPahoClientFactory factory = new DefaultMqttPahoClientFactory();
factory.setConnectionOptions(mqttConnectOptions);
return factory;
}
@Bean
public MessageChannel mqttInputChannel() {
return new DirectChannel();
}
@Bean
public MessageChannel mqttInputChannelTmp() {
return new DirectChannel();
}
@Bean
public MessageProducer inbound(MqttPahoClientFactory mqttPahoClientFactory) {
MqttPahoMessageDrivenChannelAdapter adapter = new MqttPahoMessageDrivenChannelAdapter(clientId + "-subscribe", mqttPahoClientFactory, "hello1", "topic1");
adapter.setCompletionTimeout(10000);
adapter.setConverter(new DefaultPahoMessageConverter());
adapter.setQos(1);
adapter.setOutputChannel(mqttInputChannel());
return adapter;
}
@Bean
public MessageProducer inboundTmp(MqttPahoClientFactory mqttPahoClientFactory) {
MqttPahoMessageDrivenChannelAdapter adapter = new MqttPahoMessageDrivenChannelAdapter(clientId + "-subscribeTmp", mqttPahoClientFactory, "hello2", "topic2");
adapter.setCompletionTimeout(10000);
adapter.setConverter(new DefaultPahoMessageConverter());
adapter.setQos(1);
adapter.setOutputChannel(mqttInputChannelTmp());
return adapter;
}
@Bean
@ServiceActivator(inputChannel = "mqttInputChannel")
public MessageHandler receiveHandler() {
return message -> {
String topic = message.getHeaders().get("mqtt_receivedTopic").toString();
String mess = message.getPayload().toString();
log.info("通道1监听收到来自:{}的消息:{}", topic, mess);
};
}
@Bean
@ServiceActivator(inputChannel = "mqttInputChannelTmp")
public MessageHandler receiveHandlerTmp() {
return message -> {
String topic = message.getHeaders().get("mqtt_receivedTopic").toString();
String mess = message.getPayload().toString();
log.info("通道2监听收到来自:{}的消息:{}", topic, mess);
};
}
@Bean
public MessageChannel mqttOutputChannel() {
return new DirectChannel();
}
@Bean
@ServiceActivator(inputChannel = "mqttOutputChannel")
public MessageHandler sendHandler(MqttPahoClientFactory mqttPahoClientFactory) {
MqttPahoMessageHandler messageHandler = new MqttPahoMessageHandler(clientId + "-publish", mqttPahoClientFactory);
messageHandler.setAsync(true);
messageHandler.setDefaultQos(1);
messageHandler.setDefaultTopic(defaultTopic);
return messageHandler;
}
}
|
效果
1
2
3
4
5
6
| 2023-10-12 17:01:58.089 INFO 22488 --- [erver-subscribe] c.e.mqtt.configuration.MqttSenderConfig : 通道1监听收到来自:hello1的消息:{"msg": "hello"}
2023-10-12 17:01:59.502 INFO 22488 --- [erver-subscribe] c.e.mqtt.configuration.MqttSenderConfig : 通道1监听收到来自:hello1的消息:{"msg": "hello"}
2023-10-12 17:02:00.358 INFO 22488 --- [erver-subscribe] c.e.mqtt.configuration.MqttSenderConfig : 通道1监听收到来自:hello1的消息:{"msg": "hello"}
2023-10-12 17:02:03.755 INFO 22488 --- [er-subscribeTmp] c.e.mqtt.configuration.MqttSenderConfig : 通道2监听收到来自:hello2的消息:{"msg": "hello"}
2023-10-12 17:02:04.922 INFO 22488 --- [er-subscribeTmp] c.e.mqtt.configuration.MqttSenderConfig : 通道2监听收到来自:hello2的消息:{"msg": "hello"}
2023-10-12 17:02:05.705 INFO 22488 --- [er-subscribeTmp] c.e.mqtt.configuration.MqttSenderConfig : 通道2监听收到来自:hello2的消息:{"msg": "hello"}
|
推送消息
1
2
3
4
5
6
7
8
9
10
11
12
13
14
15
16
17
18
19
20
21
| @MessagingGateway(defaultRequestChannel = "mqttOutputChannel")
public interface MqttGateway {
void sendToMqtt(String data, @Header(MqttHeaders.TOPIC) String topic);
}
@GetMapping("hello")
public String helloWorld() {
mqttUtil.sendToMqtt("helloworld", "hello1");
return "hello world";
}
|
四、总结
发现一个更好用的工具参考。
lets-mica/mica-mqtt: 基于 java aio 实现,开源、简单、易用、低延迟、高性能百万级 Java mqtt client 组件和 Java mqtt broker 服务。 (github.com)

